
First Tutorial from Calamity Jane's Cottage

Supplies needed for lined purse
2 Placemats
Fabric-this may vary due to size of place mats-3/4 yard will get the lining, loop and pockets
Webbing for handles -this also can vary, I like long enough handles to go under my arm. I measured 2-24" of webbing
Optional for closure-large button
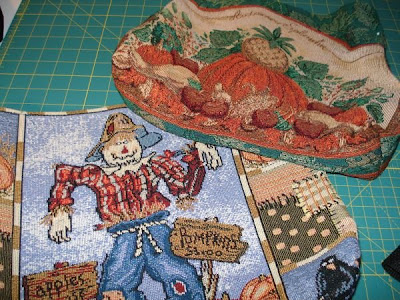
Cut your lining the same size as your placmats. I also cut 2 pockets-8"X14" and a loop for closure 2 1/2"X13", all out of lining.

When I make my pockets I fold over pocket fabric to measure 8"X7", see picture below. Sew RST and leave opening at bottom to turn pocket. Trim corners and turn.

Press pocket and pin onto lining; you will catch the bottom of the pocket at this time, which was opened for turning the pocket.
 Sew pockets to lining.


 To make box purse bottom, pull seams together and sew across where it would measure 3" across. Most of the time you would cut out a small amount, but on some placemats it would come unraveled. So I skipped that step.
  Turn bag right sides out and pin handles and loop to purse. Loop is put in the center and the handles are put 4" from the side
Slip bag into lining RST.
 Pin around top and sew the top edge.


I also put a little pleat at the side of the purse after it is all finished. You have to sew down a little from the top due to thickness here. Add a big button and you are ready to go.


 Quilter Blogs & Store Search


18 comments:
Hi Bonnie,
I'd like your info on the tutorial emailed to me. The bag is so cute, and the placemats seem to be a bit of a headstart. Great job and so adorable.
Thank you Bonnie! I will start a bag today. Great tutorial.
What great totes, love both of them! Hugs***Renea
Thanks Bonnie! I have it copied and I'm going to WalMart later today hoping to pick up a placemat there. How are yo fixed for Ike? Do you need to evacuate? blessings, marlene
I really enjoyed seeing the prograaion, makes things look easy! BTW, I am glad that your G-Baby is doin' okay.
The bag you got as a gift is beautiful. You did a great job on your tutorial.
Oh, Bonnie, the bag you got is just beautiful. I don't think people you don't sew appreciate all the work that goes into making something like that. Thanks for the great tutorial. Need to go shopping for some placemats..
Love the bag it looks fantastic.
Diane at Crafty Passions
Thanks so much for sharing the tutorial with us, I can't wait to try to make my own...
Tracy
Such a beautiful bag from the swap--very nice. Thanks for the tutorial.
Bonnie! I am tickled pink! Pink I tell you! Thank you so much for my darling Halloween bag. It is one of the nicest bags I own. I have already gotten compliments on it before I have even had a chance to use it. My little Sloan asked if she could have it, I told her nope:)
Thanks again for all your kindness.
Thank you for the tutorial! I will look at placemats in a whole different way.
Bonnie your bag from Rebecka is just so lovley and your tutorial....fantastic, nice clear instructions thanks so much ...
What a great bag tutorial, I will have to make one myself. I would like to invite you to participate in my fall quilters blog giveaway. Please chck out http://fallintofallquilters.blogspot.com/ for details.
C:\pdf995\readme.html a free PDF programe, love the bag you received, just beautiful.
Hi Bonnie,
Thank you for showing us how to make a cute tote. I'll have to try making one, down the road :)
Glad to hear Chloe is better:) I hope you'll be okay if Ike comes your way.
Warmly, Deb :)
Bonnie,
Your tutorial is great. I am so happy you liked your swap bag. I enjoyed making it for you. Your bags and aprons are so cute. I am so glad to have a new blogging friend. Take Care! :) -Rebecka
That is adorable Bonnie. Very very cute.
Post a Comment