
 Little Girl's Purse Tutorial
Supplies Needed
2 Fat Quarter (enough for two purses) I should of used two different fat quarters so you could tell the right side of the purse from the wrong side. Sorry.
1 piece of batting 18" X 22"
2 pieces of binding measuring 2 1/4" X wof
1 Piece of ribbon 30" long for handle
Velcro
Large button of your choice
With 2 fat quarters sandwiched between batting I quilted the whole piece. It is easier to quilt a larger piece of fabric and you have two purses in no time. Quilting can be done anyway you choose, see mine below.

Now you are ready to cut two pieces measuring 13 1/2" X 20 1/2.
 Take one piece of fabric and fold from the bottom up to 7 1/2", see mark below. Iron crease on bottom fold to mark fabric. This is the bottom of the purse where you folded it.
 I took a saucer at this point to round off the top edge of the purse, you can use anything to make a curve.
Trim top edge of purse.
 This is how it looks before sewing.
Cut binding 2 1/4" X wof.
 Sew together ends as shown below. I put of piece of tape just to show you how to piece the binding together.
After sewn trim away edge.

Iron seam open.
 Now press binding in half, long edges together. I love pressing on a towel.
The first seam to sew is attaching the binding to the edge of the purse that is straight. It measures 13 1/2" long. I sew a 3/8" seam with my quilting foot.
 After attaching binding you trim away ends.
 Fold over binding and pin down, if you use these measurements and fold it over the top edge it will be longer in the back and you will catch the seam when you sew the binding down on the right side of your purse. I sew in the seam and you cannot see it from the front.
 This is how the inside binding of the purse will look.
 Now attach binding all around the purse outer edge and curve. Go slow around the curve. Cut small slits around curve so it folds back easier. I don't trim my fabric away due to wanting the 3/8' seam, so the binding folds around it at the right measurement. Then fold back and sew on the right side of the purse in the seam.

Remember the crease you made with the iron folding the bottom up to 7 1/2", fold the bottom back up, pin and sew the sides of the purse edge.
 You can use any width of ribbon, but mine was a little wide so I folded it in half and stitched it together.
 Attach ribbon to purse on the inside where purse opens and sew on Velcro. I used what I had and I know tan does not go with these colors but gotta work with my supplies.
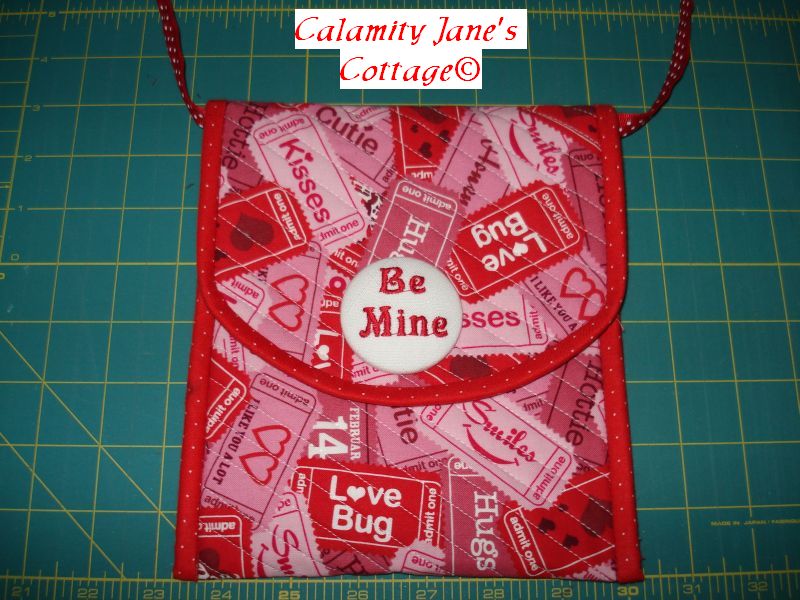
 I embroidered "Be Mine" several times and cut out the circles for the big covered buttons.
 Attach button and you are finished. I hope these instructions are understandable.
Keep Stitchen'
Bonnie


 Quilter Blogs & Store Search


