First Tutorial from Calamity Jane's Cottage

Supplies needed for lined purse
2 Placemats
Fabric-this may vary due to size of place mats-3/4 yard will get the lining, loop and pockets
Webbing for handles -this also can vary, I like long enough handles to go under my arm. I measured 2-24" of webbing
Optional for closure-large button
Cut your lining the same size as your placmats. I also cut 2 pockets-8"X14" and a loop for closure 2 1/2"X13", all out of lining.

When I make my pockets I fold over pocket fabric to measure 8"X7", see picture below. Sew RST and leave opening at bottom to turn pocket. Trim corners and turn.

Press pocket and pin onto lining; you will catch the bottom of the pocket at this time, which was opened for turning the pocket.
 Sew pockets to lining.

Pin RST, front and back of purse, sew sides and bottom. Sew the same for the lining but leave an opening at the bottom of the lining for turning.

Make loop by folding in sides to the center and then folding again to make a piece that will measure about 1/2"X13". This can vary depending on what size you would like. I took a picture of how I fold this to make a loop for the button.
 To make box purse bottom, pull seams together and sew across where it would measure 3" across. Most of the time you would cut out a small amount, but on some placemats it would come unraveled. So I skipped that step.
  Turn bag right sides out and pin handles and loop to purse. Loop is put in the center and the handles are put 4" from the side

Slip bag into lining RST.
 Pin around top and sew the top edge.

Turn purse through opening in bottom of lining and sew the opening closed.

Pin around the top edge and make sure the handles and loop are not in the way when you sew this step. Since we are working with placemats in the project, this can be a little thick.

I also put a little pleat at the side of the purse after it is all finished. You have to sew down a little from the top due to thickness here. Add a big button and you are ready to go.

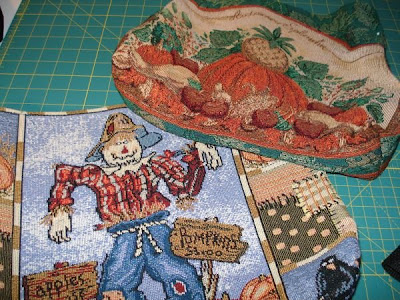
These are some other placemats I had that would make cute fall purses. If you have any questions please email me at orders@calamityjanescottage.com . I can email this file to you.
I'll be signed off for a while due to hurricane Ike and will be back soon.
Thank you,

 x
x


 Sew pockets to lining.


 To make box purse bottom, pull seams together and sew across where it would measure 3" across. Most of the time you would cut out a small amount, but on some placemats it would come unraveled. So I skipped that step.
  Turn bag right sides out and pin handles and loop to purse. Loop is put in the center and the handles are put 4" from the side
 Pin around top and sew the top edge.



















 Quilter Blogs & Store Search


